DIY Shamrock Bottle Cap Sign for St. Patrick’s Day
No blarney about it! Our Flex Seal DIY St. Patrick’s Day decor totally Shamrocks!
Craft a one-of-a-kind shiny golden work of art that’ll make all the leprechauns green with envy, using Flex Seal Green, Flex Glue, and everyday materials.

Before using Flex Seal, please read all the directions carefully.
In a well-ventilated area, lay down a tarp and place the shamrock on top. Holding the Flex Seal® Green, begin to spray 8” to 12” inches from the surface. Use even sweeping motions to cover the entire surface of the shamrock. Once completely covered and you’re happy with the outcome, set to dry.
 More tips on using Flex Seal Spray
Next, arrange and position the bottle caps, top side down, onto the piece of wood until the wood is fully covered. You can create a design or place the bottlecaps in rows, whatever makes you happy. To help remember the pattern and spacing, snap a picture. Then, remove all the bottle caps from the wood plank.
Now it’s time to secure the caps with Flex Glue Clear.
First, unscrew the nozzle of the Flex Glue Clear. Using a pair of scissors or a razor blade, cut an opening large enough to ensure the glue is easily dispensed. Next, apply a liberal amount of Flex Glue Clear to the top side of each bottle cap, and recreate your chosen design onto the wood. Make sure to apply firm pressure continuously for a minimum of 10-30 seconds for instant grab to take hold. Repeat this process, gluing all the bottle caps in place until the design is complete.
Flex Tip: Even though the instant grab will take hold in 10-30 seconds, there is still be plenty of time to slide and rearrange the bottle caps if needed in before the glue fully sets, which is perfect for this project!
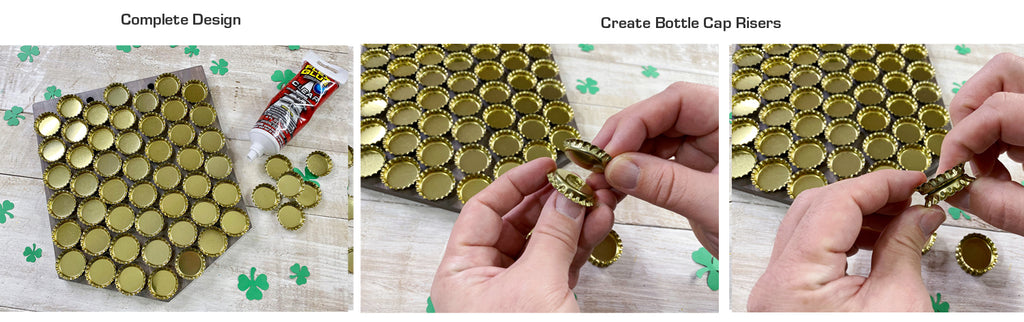
Use Flex Glue Clear to build “bottle cap risers” which will hold the shamrock away from the wood base to create a more dynamic effect. To do this, glue the bottle cap tops together like a sandwich. Make sure to press them together firmly for 10-30 seconds for instant grab to take hold. Create 3 sets of bottle cap risers.
Flex Tip: For an even more dramatic effect, create another layer!
First, center the shamrock on the wood base. Then, remove to position the bottle cap risers so they’ll be hidden by the leaves of the shamrock, once it’s glued into place. Apply a generous amount of Flex Glue Clear to the bottoms of the risers and glue in place.
Next, apply Flex Glue Clear to the top of each bottle cap riser. Position the shamrock into place, and apply light pressure until Flex Glue Clear’s instant grab takes hold.
Thread twine through the top holes of the wood base and tie off each end in a knot to hang. Allow curing for 24-48 hours before hanging.

![]()
By Dennis Setteducati and Andrew Boza
HGTV Handmade‘s Crafty Lumberjacks (aka Dennis Setteducati and Andrew Boza) are flannel-loving bloggers and experts in all-things DIY—including holiday decor! They’ve appeared on GMA, LIVE with Kelly & Ryan, The Chew and The Rachael Ray Show and can been seen regularly on the HGTV Handmade YouTube channel getting crafty with their cat.